
In any modern workspace, a tangle of cables is a common sight. Power leads, charging cables, and peripheral wires can quickly create a disorganised and distracting environment. This not only affects the aesthetic of your desk but can also impact productivity and safety. A clean and organised workspace begins with understanding the core principles, including the importance of effective cable management and securing wiring on desks, which contributes significantly to both aesthetics and functionality.
Effective cable management is about creating a clean, functional, and efficient space. This guide provides ten practical desk cable management ideas, detailing various techniques and solutions to help you achieve a streamlined setup. We will explore routing tactics, hiding solutions, and modular systems tailored for workspaces with multiple devices, such as those including iPhones and other personal electronics.
The goal is to offer straightforward, actionable advice to help you reclaim your desk from cable clutter. Each idea is presented with clear instructions and practical examples, enabling you to implement these solutions regardless of your desk type or the number of devices you use. By applying these concepts, you can transform your workspace into a more organised and productive area.
1. Under-Desk Cable Trays for a Concealed Solution
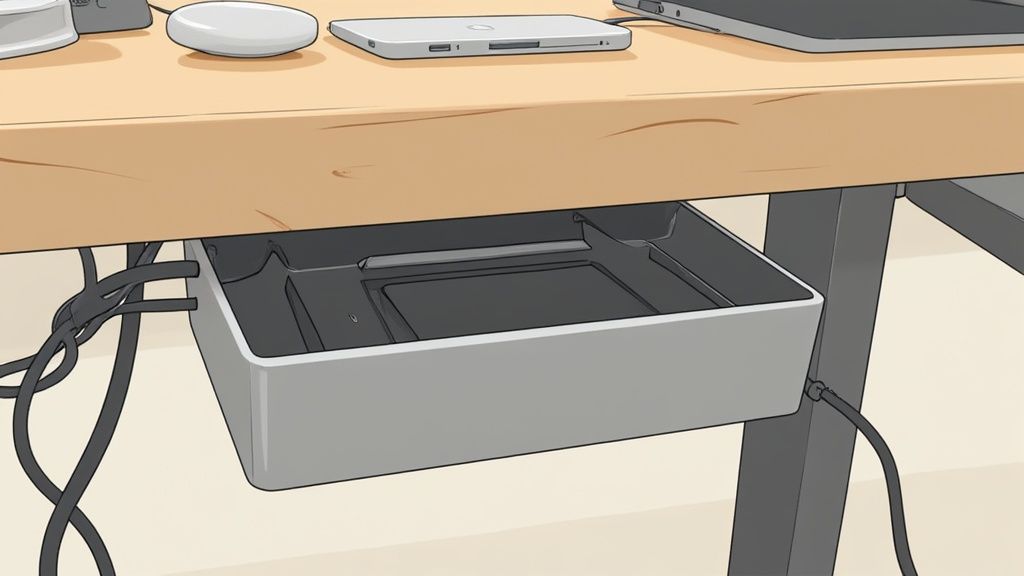
One of the most effective desk cable management ideas involves lifting your wiring completely off the floor. An under-desk cable tray, sometimes called a raceway, provides a dedicated, hidden channel mounted directly beneath your desk’s surface. This approach is ideal for managing the bulkiest items that create the most clutter: power strips, extension leads, and cumbersome AC adapters.
By containing these items in a single, organised space, you achieve a clean, minimalist aesthetic while keeping everything accessible. The tray conceals the visual mess from every angle, yet you can still easily reach your power sources when needed. This method is particularly useful for setups with multiple monitors, speakers, and charging hubs, as it prevents a "snake pit" of cables from forming around your feet, which also eliminates a potential trip hazard.
How to Implement This Solution
- Materials: You will need an under-desk cable tray (mesh or solid), a drill, and the screws included with the tray.
- Step 1: Position your power strip inside the tray and plug in all necessary devices. This helps you determine the best placement for the tray.
- Step 2: Hold the tray against the underside of your desk, ensuring it is not too close to the edge where your knees might hit it. A position towards the back is usually best.
- Step 3: Mark the screw holes with a pencil, then drill small pilot holes to make installation easier.
- Step 4: Securely screw the tray into place and arrange your cables and adapters neatly inside.
2. Cable Management Boxes and Sleeves
Another excellent desk cable management idea involves grouping and hiding wires using either a rigid box or a flexible fabric sleeve. A cable management box is a simple container designed to house a power strip and all its connected plugs, concealing the entire cluster from sight. Similarly, a cable sleeve wraps around a bundle of cords running from your desk to a power source, creating a single, tidy tube instead of a tangled mess.
These solutions are perfect for tidying cables that run along the floor or up a desk leg, instantly improving the visual appeal of your workspace. By enclosing the wires, they are also protected from dust, pets, and accidental spills, which can prolong their lifespan. This method is particularly useful for setups where drilling into the desk is not an option, offering a non-permanent yet highly effective way to declutter. Modern charging technologies, such as those used in MagSafe systems, also benefit from organised cabling to maintain a streamlined setup; you can find more information about MagSafe charging here.
How to Implement This Solution
- Materials: You will need a cable management box or a zipped/velcro cable sleeve.
- Step 1: Unplug your power strip and place it inside the box, or gather the cables you wish to conceal into a single bundle for the sleeve.
- Step 2: Feed the main power cord for the strip out of one end of the box. For a sleeve, start wrapping it around your cable bundle from one end.
- Step 3: Plug all your device cables into the power strip inside the box, feeding them through the side openings. Close the lid to conceal the clutter.
- Step 4: For a sleeve, continue zipping or wrapping it along the length of the cables until they are fully contained, creating a neat, unified look.
3. Velcro Cable Ties and Straps for Flexible Bundling
For a simple yet highly effective desk cable management idea, reusable velcro ties offer unmatched flexibility. Unlike single-use zip ties, these hook-and-loop fasteners allow you to easily add, remove, or reorganise cables as your setup evolves. This makes them ideal for bundling wires that run along the back of a desk or down a desk leg, keeping them grouped neatly without permanent commitment.
This method is particularly useful for managing cables by function, such as keeping all your power cords together and separate from your data or audio leads. By creating distinct bundles, you can quickly trace a single cable from its source to its destination, simplifying troubleshooting and device swaps. Velcro straps are a go-to solution for taming the inevitable mess of peripheral wires from keyboards, mice, and charging hubs into a single, manageable trunk line.
How to Implement This Solution
- Materials: You will need a roll of velcro cable ties or a pack of pre-cut straps.
- Step 1: Gather the cables you wish to bundle together. For a cleaner look, run a comb or your fingers along their length to straighten them out.
- Step 2: Group the cables according to their function (e.g., all USB-C and Lightning cables together). For an even tidier setup, consider how a retractable 4-in-1 charging cable can reduce the number of individual wires needed.
- Step 3: Wrap a velcro tie around the bundle. Ensure it is snug enough to hold the cables securely but not so tight that it could damage the wiring or restrict airflow.
- Step 4: Place additional ties every 30-40 centimetres along the length of the cable run to maintain a uniform and organised appearance.
4. Desk Cable Tray or Under-Desk Raceway
One of the most effective desk cable management ideas for a professional finish is lifting your wiring completely off the floor. An under-desk raceway or cable tray provides a dedicated, hidden channel mounted directly beneath your desk’s surface. This approach is ideal for managing the bulkiest items that create the most clutter: power strips, extension leads, and cumbersome AC adapters.
By containing these items in a single, organised space, you achieve a clean, minimalist aesthetic while keeping everything accessible. The tray conceals the visual mess from every angle, yet you can still easily reach your power sources when needed. This method is particularly useful for setups with multiple monitors, speakers, and charging hubs, as it prevents a "snake pit" of cables from forming around your feet, which also eliminates a potential trip hazard. This solution is favoured in modern office designs for its sleek and unobtrusive finish.
How to Implement This Solution
- Materials: You will need an under-desk cable tray (mesh or solid), a drill, and the screws included with the tray.
- Step 1: Position your power strip and largest adapters inside the tray to plan the layout. This helps you determine the best placement for the tray itself.
- Step 2: Hold the tray against the underside of your desk, ensuring it is towards the back so it does not interfere with your knees.
- Step 3: Mark the screw holes with a pencil, then drill small pilot holes to make installation easier and prevent the wood from splitting.
- Step 4: Securely screw the tray into place and arrange your cables neatly inside. For better organisation, use cable ties or sleeves within the tray itself.
5. Spiral Wrap or Neoprene Tubing for Flexible Bundling
For cables that need to travel together from one point to another, such as from a PC tower to a monitor, spiral wrap or neoprene tubing offers a simple and flexible grouping solution. This method involves encasing a bundle of wires within a flexible sleeve, transforming a chaotic tangle into a single, organised conduit. This is one of the most adaptable desk cable management ideas for tidying visible cable runs.
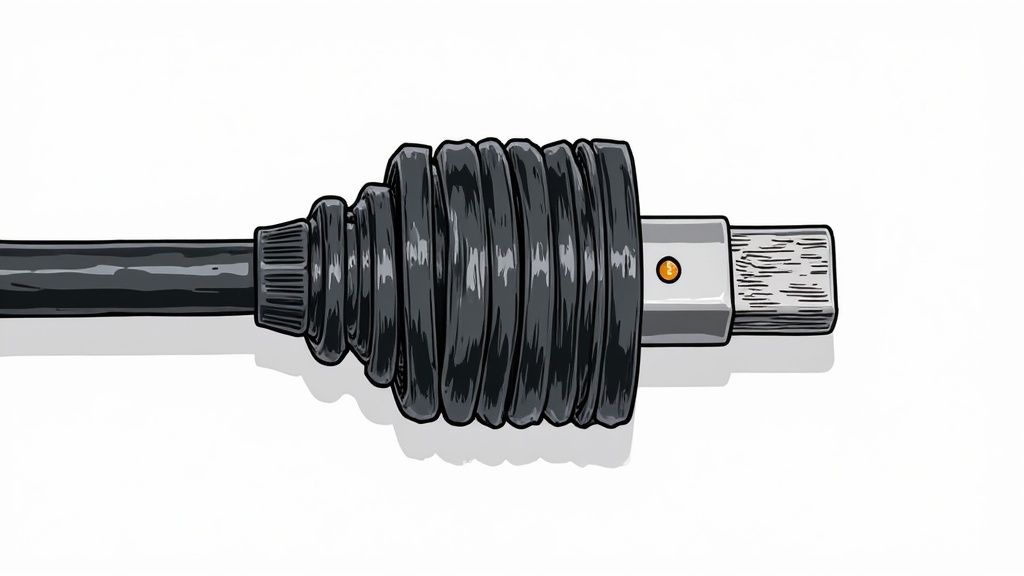
Unlike rigid channels, these flexible sleeves can easily navigate corners and accommodate the movement of sit-stand desks or adjustable monitor arms. The spiral design is particularly useful as it allows cables to enter or exit the bundle at any point along its length, providing excellent versatility for complex setups. Neoprene versions often use a zip or velcro, offering a sleek, premium finish that completely conceals the cables within.
How to Implement This Solution
- Materials: You will need spiral wrap or neoprene sleeving of the appropriate diameter, and a pair of scissors.
- Step 1: Gather the cables you intend to bundle together. Measure the total length required and cut the wrap or sleeve to size, leaving a little extra for flexibility.
- Step 2: Starting at one end, begin wrapping the spiral tubing around the cable bundle. If using a neoprene sleeve, simply open it, place the cables inside, and zip or fasten it shut.
- Step 3: Systematically work your way down the entire length of the cables, ensuring the wrap is snug but not overly tight. This allows for heat dissipation and future adjustments.
- Step 4: For a clean finish, you can use a small cable tie or a piece of hook-and-loop tape at each end of the wrap to prevent it from slipping.
6. Power Strip with Integrated Cable Management
Tackling cable clutter directly at the source is one of the most efficient desk cable management ideas. A power strip with integrated management features provides a two-in-one solution, combining power distribution with organisational channels, clips, or covers. This design helps to neatly route the thickest and most stubborn power cords right where they plug in, preventing them from sprawling across your desk or floor.
This approach is particularly effective for users who need to manage multiple AC adapters and plugs in a concentrated area. By organising each cable as it leaves the power strip, you prevent the initial tangle that often spreads across a workspace. Models from brands like Belkin and APC often include features like sliding covers to hide excess cable length or built-in channels that guide wires in a single, orderly direction, creating a tidy foundation for the rest of your setup.
How to Implement This Solution
- Materials: You will need a power strip with built-in cable management features.
- Step 1: Position the power strip in a convenient location, such as on the floor behind your desk or mounted to the underside of the surface, ensuring all your device cables can reach it comfortably.
- Step 2: Plug in your devices, paying attention to any larger AC adapters that might block adjacent outlets. Measure the spacing if you have several bulky plugs.
- Step 3: Route each power cord through the designated clips, channels, or covers provided on the power strip. This keeps the cables secure and organised at their origin point.
- Step 4: Ensure the surge protection rating is adequate for your valuable equipment, such as your computer and monitors. This is a crucial step for protecting your technology.
7. Adhesive Cable Channels or Wall Raceways
When cables must travel a visible distance along a wall or the edge of a desk, adhesive cable channels offer one of the most professional desk cable management ideas. Also known as wall raceways, these plastic conduits stick directly onto surfaces, creating a discreet housing that completely hides wires from sight. This method is perfect for routing cables from a wall-mounted monitor down to your desk or connecting a desk to a distant power socket without leaving wires trailing across the floor.
By enclosing cables within a dedicated channel, you create a clean, intentional look that blends seamlessly with your environment. Many raceways can be painted to match your wall or furniture colour, making them almost invisible. This solution not only tidies the visual clutter but also protects your cables from being snagged, tripped over, or damaged, making it an excellent choice for high-traffic areas in a home office or gaming setup.
How to Implement This Solution
- Materials: You will need adhesive cable channels (raceways), corner or connector pieces, and rubbing alcohol for surface preparation.
- Step 1: Plan your entire cable route from start to finish. Measure the lengths required and determine where you will need corner pieces or T-junctions for a polished look.
- Step 2: Thoroughly clean the intended surface with rubbing alcohol to remove any dust or oils. This ensures the adhesive backing will form a strong, lasting bond.
- Step 3: Peel the backing from a channel section and press it firmly into place. Open the channel, place your cables inside, and then snap the cover shut.
- Step 4: Continue adding sections and corner pieces until your route is complete. For the ultimate integrated finish, you can paint the raceways to match your wall colour.
8. Cable Labels and Identification Systems
An organised desk is not just about hiding cables; it is also about knowing what each cable does. Cable labels and identification systems are a fundamental part of effective desk cable management ideas, allowing you to quickly identify and manage every wire without guesswork. By tagging each cable at both ends, you transform a tangled mess into a logical, easy-to-navigate system.
This approach is crucial for complex setups with numerous peripherals, such as docking stations, multiple monitors, and audio equipment. When you need to unplug a specific device, a clear labelling system prevents you from accidentally disconnecting something important. Using colour-coded tape, printed labels, or reusable markers ensures your setup remains manageable long-term, saving significant time and frustration during future upgrades or troubleshooting.
How to Implement This Solution
- Materials: You will need a label maker (like those from Brother or Brady), pre-made cable tags, or colour-coded electrical tape.
- Step 1: Create a simple, consistent naming convention for all your devices. For example, "Monitor 1 - HDMI" or "Dock - USB-C".
- Step 2: Print or write your labels. For maximum clarity, create two identical labels for each cable: one for each end.
- Step 3: Firmly attach one label near the plug that connects to your device and the other near the plug that connects to the power source or hub.
- Step 4: For added organisation, consider creating a simple diagram or spreadsheet documenting your connections, which can be invaluable when reorganising your desk.
9. Modular Cable Management Accessories
For those whose desk setup is constantly evolving, a static solution may not be sufficient. Modular cable management accessories offer a flexible, interconnected system of components like clips, sleeves, and channels that work together. This approach is perfect for adapting to new devices, changing desk layouts, or accommodating future technology without starting from scratch.
This method allows you to build a customised cable management solution piece by piece, ensuring it perfectly matches your specific requirements. Systems from brands like Humanscale or Ergotron provide a cohesive ecosystem where each part is designed to integrate seamlessly with the others. This makes it one of the most scalable and future-proof desk cable management ideas for tech enthusiasts who frequently upgrade their hardware.
How to Implement This Solution
- Materials: A starter kit from a modular system (e.g., clips, channels, mounting bases) or individual components selected for your needs.
- Step 1: Begin by mapping out your current cable pathways and anticipating future additions, such as a new monitor or charging hub.
- Step 2: Start with foundational components. Install a primary channel or spine along the back of your desk to serve as the main artery for your wiring.
- Step 3: Add smaller, specialised components as needed. Use individual cable clips to guide wires from your keyboard and mouse, or add a vertical channel to manage cables running from the desk to the floor.
- Step 4: As you add new devices, simply purchase and integrate compatible accessories into your existing system. This allows for gradual and cost-effective expansion.
10. Desk Routing Holes and Built-in Cable Management
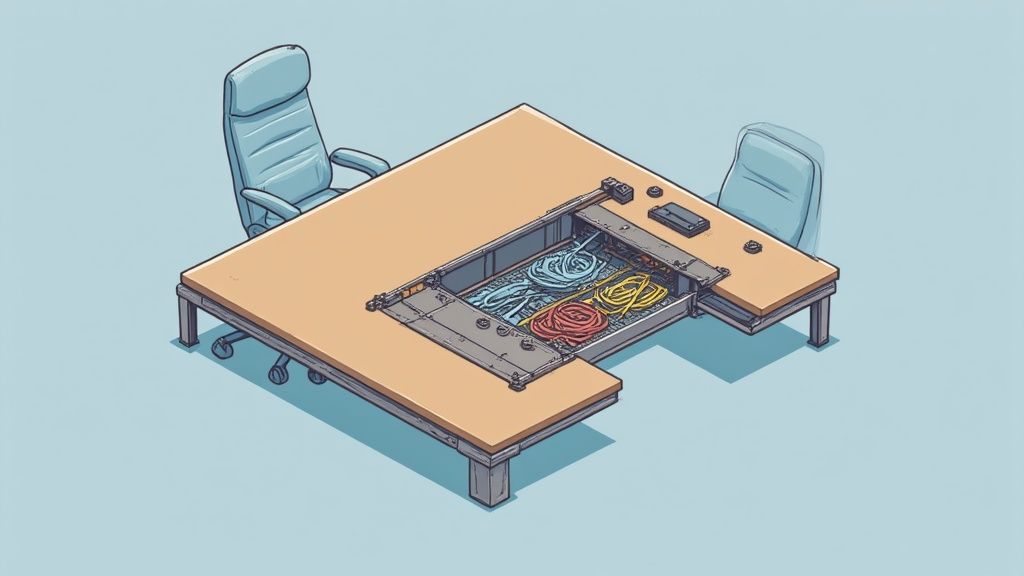
For a truly seamless and integrated solution, consider a desk designed from the ground up with cable management in mind. Many modern desks come with built-in features like pre-drilled routing holes, cable grommets, and integrated channels. These features provide a permanent and streamlined way to guide cables from your devices to their power sources, completely hiding them within the structure of the desk itself.
This approach is perfect for those planning a new setup or willing to upgrade their workspace furniture. Desks from brands like Herman Miller and Steelcase often incorporate these systems, offering a clean, professional aesthetic right out of the box. By routing cables through these purpose-built openings, you keep your desktop clear and prevent wires from dangling untidily behind or underneath your workspace, making it one of the most elegant desk cable management ideas available.
How to Implement This Solution
- Materials: A desk with built-in cable management features. Cable grommet covers may also be included or purchased separately.
- Step 1: Before purchasing, plan your setup. Identify where your monitors, charging docks, and other peripherals will sit to ensure the desk’s routing holes are conveniently located.
- Step 2: When assembling the desk, feed your main power and display cables through the designated grommets or channels before placing all your equipment. This is much easier to do with an empty surface.
- Step 3: Connect your devices, guiding each cable through the nearest opening. Utilise any under-desk channels or trays to route the cables towards your power strip.
- Step 4: Once everything is connected, insert any grommet covers to create a clean finish. Leave some slack in your cables to allow for minor adjustments to your equipment.
Desk Cable Management: 10-Option Comparison
| Solution | 🔄 Implementation Complexity | ⚡ Resource Requirements | 📊 Expected Outcomes | Ideal Use Cases | ⭐ Key Advantages / 💡 Tip |
|---|---|---|---|---|---|
| Cable Clips and Clamps | Low — adhesive or simple screws | Very low cost; minimal materials | Keeps cables visible, prevents sagging/tangle | Home desks, monitors, small setups | Inexpensive & easy to install. Tip: clean surface before applying. |
| Cable Management Box / Sleeve | Low — simple placement or slip-on | Low–medium (box or fabric sleeve) | Conceals bundles; protects from dust/spills | Under-desk bundles; visible desktop runs | Improves aesthetics and protection. Tip: measure bundle diameter first. |
| Velcro Cable Ties and Straps | Very low — manual bundling | Very low cost; reusable | Flexible bundling; easy reconfiguration | Frequent changes, travel, simple bundles | Reusable and non-damaging. Tip: do not wrap too tightly. |
| Desk Cable Tray / Under-Desk Raceway | Medium–High — requires mounting | Medium–high (hardware, tools, possible pro install) | Centralises many cables; professional look | Offices, open floor plans, heavy cabling | High capacity and accessibility. Tip: leave 20–30% spare capacity. |
| Spiral Wrap or Neoprene Tubing | Low — wrap-around application | Low cost; various diameters | Neat grouping; abrasion protection | Medium bundles where add/remove needed | Flexible and protective. Tip: start at one end and secure ends. |
| Power Strip with Integrated Management | Low–Medium — mount and arrange | Medium (surge protector features) | Reduces source clutter; combined power & routing | Power-dense desks, charging stations | Combines surge protection + organisation. Tip: position to minimise cable lengths. |
| Adhesive Cable Channels / Wall Raceways | Low–Medium — stick or mount along surfaces | Low–medium; paintable options | Streamlined, protected long runs | Wall/baseboard routing; TV/AV setups | Professional finish and protection. Tip: plan routing and clean surfaces before applying. |
| Cable Labels & Identification Systems | Medium — time investment for labelling | Low (labels/printer) | Faster troubleshooting; reduced errors | Server racks, AV, scalable installations | Essential for maintenance. Tip: label both ends and keep a master diagram. |
| Modular Cable Management Accessories | Medium–High — system planning | Medium–high initial investment | Scalable, cohesive management | Growing or complex setups, brand ecosystems | Adaptable and upgradeable. Tip: start with essentials and expand. |
| Desk Routing Holes & Built-in Management | High — requires furniture selection or replacement | High (new desk or custom mods) | Integrated clean routing; long-term solution | New office builds, permanent workstations | Seamless, built-in organisation. Tip: choose desks with multiple grommet options. |
Bringing It All Together for a Tidy Desk
We have explored a variety of effective desk cable management ideas, from simple adhesive clips to comprehensive under-desk raceways. The journey to a perfectly organised desk is not about finding one perfect solution, but rather about creating a tailored system by combining several of these techniques. Your ideal setup might involve an under-desk tray to house the main power strip, spiral wrap to bundle cables leading to your monitor, and adhesive clips to guide your iPhone charging cable to its exact spot.
The central principle is to build a strategy that matches your specific needs. A minimalist setup with just a laptop and a charging dock requires a different approach than a complex gaming or creative workstation with multiple monitors, peripherals, and external drives. By thoughtfully selecting and implementing the right tools, you move beyond temporary fixes and establish a lasting, organised environment.
Key Takeaways for Lasting Organisation
Remember these core concepts as you begin your cable management project:
- Plan Before You Place: Before sticking any clips or mounting any trays, map out where your devices will live and how their cables will travel. This initial planning prevents rework and ensures the most efficient routing.
- Combine and Conquer: The most successful setups use a combination of methods. Use a cable box for the power brick mess, velcro ties for bundling computer cables, and a discreet sleeve for wires running from your desk to the wall socket.
- Accessibility is Crucial: While hiding cables is the goal, ensure you can still access them easily. Using velcro ties instead of permanent zip ties, or a cable tray with an open design, allows for simple adjustments when you add or remove a device.
- Consistency is Professional: A tidy desk is more than just functional; it is also about aesthetics. Using consistent solutions, such as the same style of cable clips or a single colour of spiral wrap, creates a cohesive and professional look.
The Real Value of a Tidy Workspace
Ultimately, mastering these desk cable management ideas does more than just improve the appearance of your workspace. A decluttered desk contributes to a decluttered mind, reducing distractions and allowing you to focus more effectively on your tasks. It also protects your equipment from accidental snags and makes cleaning your desk area significantly easier.
Taking an hour or two to implement these strategies is a direct investment in your daily productivity and well-being. The result is a clean, efficient, and personalised space that supports your workflow rather than hindering it. Start small, perhaps by tackling the cables behind your monitor, and build from there. You will find that the sense of control and order it brings is well worth the effort.
Ready to elevate your desk setup with charging solutions designed for a tidy space? The multi-device charging docks from Cablenova are engineered with a minimalist footprint and smart design, helping you power your iPhone, Apple Watch, and AirPods from a single, elegant hub. Explore our collection at Cablenova to find the perfect centrepiece for your newly organised desk.